
설치참조 : https://docs.microsoft.com/ko-kr/windows/wsl/install-win10
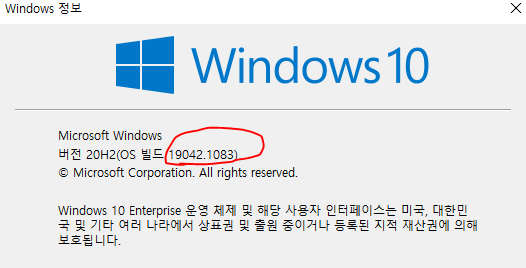
윈도우 버전 체크
빌드 번호는 18362.1049 이상 또는 18363.1049 이상이고, 부 빌드 번호는 .1049 이상
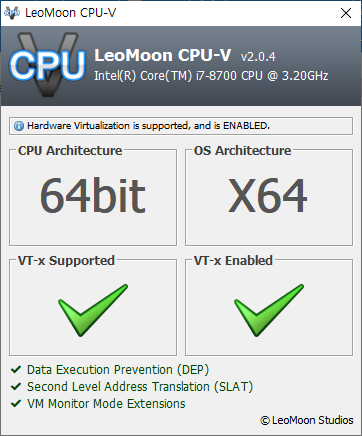
가상지원여부 화인
참조: https://blog.dalso.org/it/12256, https://leomoon.com/downloads/desktop-apps/leomoon-cpu-v/
아래 그림 처럼 가상화가 지원이 안되면
관리자 powershell에서 “bcdedit /set hypervisorlaunchtype off” 실행 후 제부팅 하고 다시 확인해본다.
다시 확인 했는데도 지원이 안되면 안되는 CPU임
참고 URL : https://blog.dalso.org/it/14465
Linux용 Windows 하위 시스템 사용 설정
PowerShell을 관리자 권한으로 아래 명령어 실행 하고 윈도우 재부팅
dism.exe /online /enable-feature /featurename:Microsoft-Windows-Subsystem-Linux /all /norestartPowerShell을 관리자 권한으로 아래 명령어 실행 하고 윈도우 재부팅
Virtual Machine 기능 사용
dism.exe /online /enable-feature /featurename:VirtualMachinePlatform /all /norestartWSL 2를 기본 버전으로 설정
wsl --set-default-version 2Ubuntu 20.04 LTS 배포판 설치
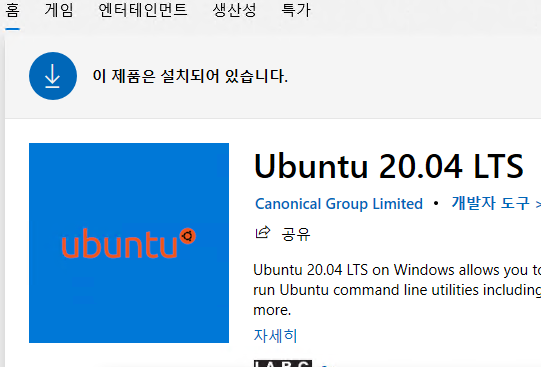
MS Store에서 Ubuntu 20.04 LTS를 받아서 설치 한다.
배포버전 확인
wsl --list --verbosewsl2 shutdown
wsl --shutdownC:/Users/<user name>/.wslconfig 파일을 생성하여 WSL2가 사용하는 자원을 한정 한다.
작업관리자에서 프로세스 Vmmem를 보면 메모리와 CPU 를 얼마나 사용하는지 알 수 있다.
[wsl2]
memory=4GB # Limits VM memory in WSL 2 to 4 GB
processors=2 # Makes the WSL 2 VM use two virtual processors
한글 폰트 설치
나눔폰트 설치
$ sudo apt update
$ sudo apt upgrade
$ sudo apt-get install fonts-nanum fonts-nanum-coding fonts-nanum-extra
시스템 한글설정
# locale 확인
$ locale

# locale 변경
# ko_KR.UTF8 선택
$ sudo dpkg-reconfigure locales

# WSL 다시 시작
Windows용 X Server 설치
참조 : https://blog.nadekon.net/115
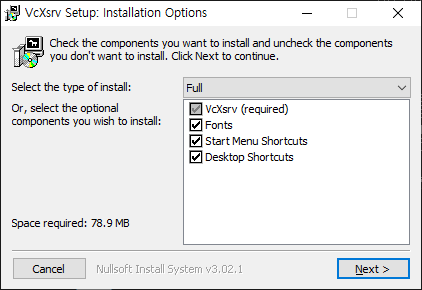
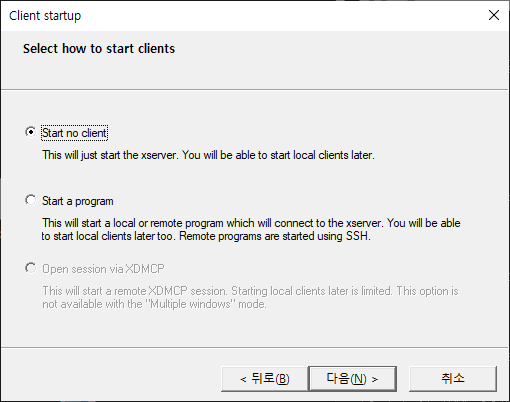
Windows에서 Ubuntu x windows 어플리케이션 띄우기 위해 Windows에 VcXsrv서버 설치
Display number : 0 으로 설정
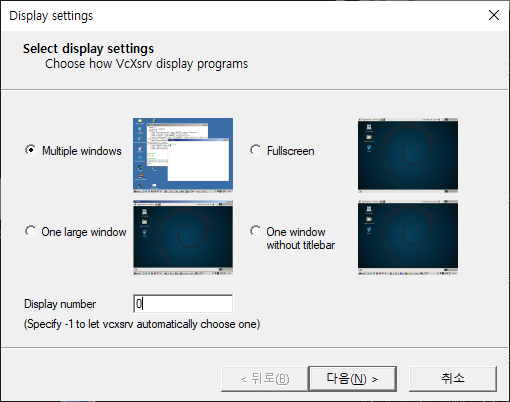
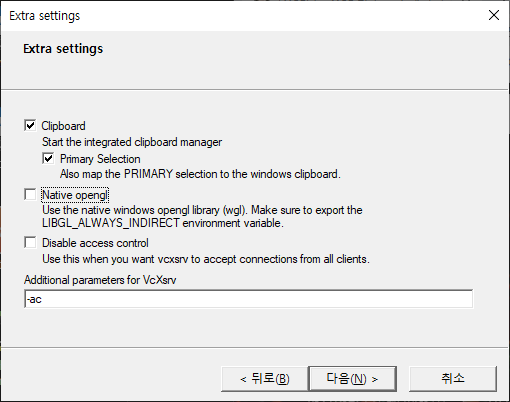
Additional parameters 부분에 -ac 입력
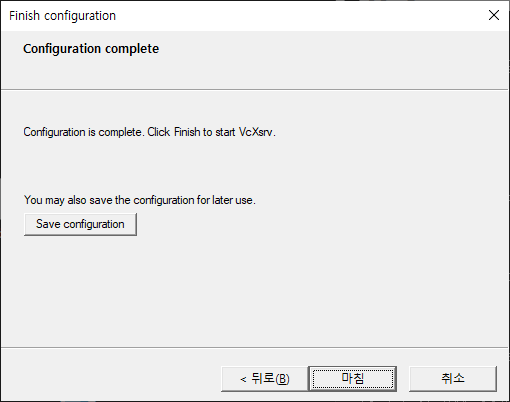
“Save configuration” 으로 설정 저장
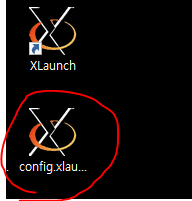
설정이 끝나면 아래 처럼 아이콘이 두개 생김, confi.. 를 실행하면 xserver가 실행이 되고 윈도우 트레이에서 볼 수 있다.
Ubuntu .bashrc에 x-server 환경 추가하기
.bashrc에 아래 코드를 추가 한다.
# For WSL 2 only (Using IP from resolv.conf (vEthernet))
VETHER_IP=$(/bin/grep nameserver /etc/resolv.conf 2> /dev/null | /bin/tr -s ' ' | /bin/cut -d' ' -f2)
export DISPLAY=$VETHER_IP:0.0
# 새로운 환경 재로딩

$ source .bashrc
X11 Application 테스트를 위한 설치
$ sudo apt install x11-apps시스템 X11 어플리케이션 메뉴 한글 표시
$ sudo /etc/init.d/dbus start
$ sudo dbus-daemon --system
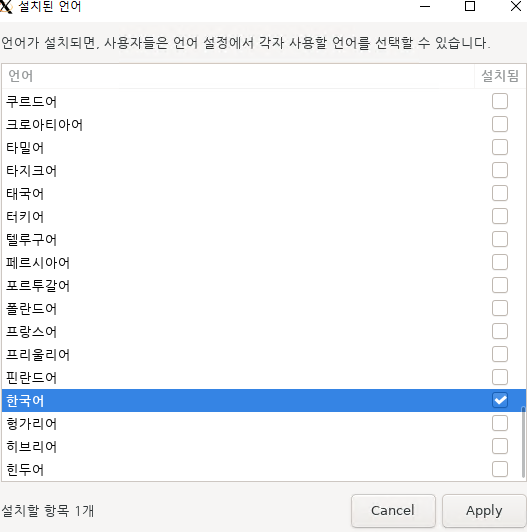
$ sudo apt install language-selector-gnome
$ sudo gnome-language-selector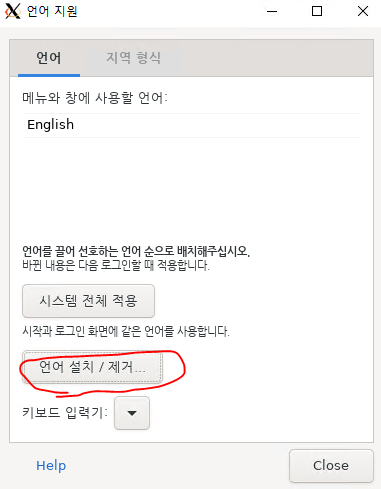
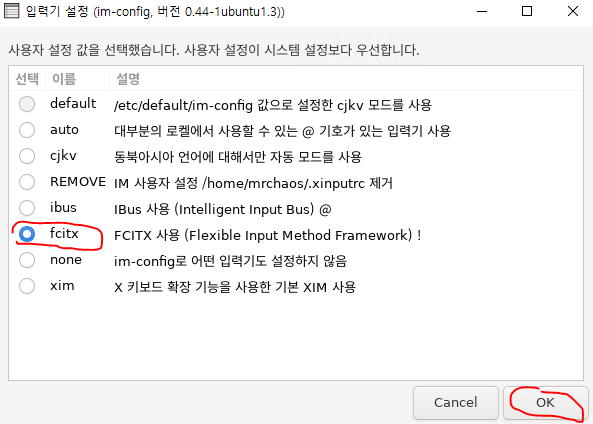
WSL2에서 한글 입력 사용하기
한글입력기 설치
$ sudo apt install fcitx fcitx-hangul fonts-noto-cjk dbus-x11
$  im-config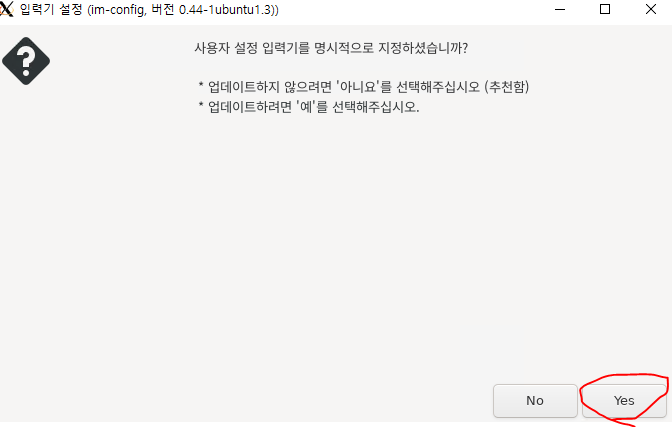
.bashrc 업데이트
파일의 맨 아래 다음을 추가 한다.
#!/bin/bash
export QT_IM_MODULE=fcitx
export GTK_IM_MODULE=fcitx
export XMODIFIERS=@im=fcitx
export DefaultIMModule=fcitx

#optional
fcitx-autostart &>/dev/null
$ source .bashrc한글 입력기가 제대로 설치 된지 확인
$ fcitx-config-gtk3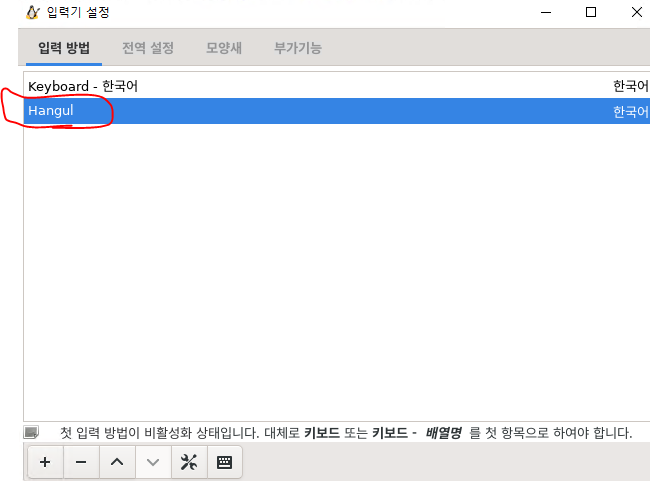
한글/영어 토글 : Ctrl-Space
한글 입력 테스틀을 위해 Kate설치
$ sudo apt install kate
$ kate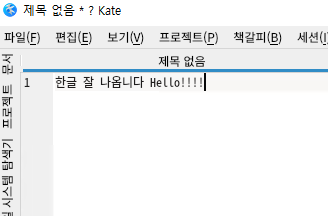
크롬 브라우즈 설치
# 디렉터리를 임시 폴더로 변경.
$ cd /tmp

# Wget을 사용 하 여 다운로드.
$ sudo wget https://dl.google.com/linux/direct/google-chrome-stable_current_amd64.deb

# 현재 안정적인 버전 가져오기:
$ sudo dpkg -i google-chrome-stable_current_amd64.deb

# 패키지 수정
$ sudo apt install --fix-broken -y

# 패키지 구성
$ sudo dpkg -i google-chrome-stable_current_amd64.deb

# 브라우즈 시작
$ google-chrome
배포패키지 설치
# gedit 설치
$ sudo apt install gedit

# krusader 설치와 필요 아이콘 설치
$ sudo apt install krusader
$ sudo apt install breeze-icon-theme
How to move the vhdx of wsl2 to other disk
https://github.com/MicrosoftDocs/WSL/issues/412
이미 설치된 wsl2를 다른 디스크로 옮기고 싶은 경우 아래와 같이 하면됨
관리자 모드의 powershell 열기
예) 먼저 E 드라이브에 export할 폴더 “tmp” 와 import할 폴더 “WSL2” 를 만들고 아래와 같이 작업한다.
마지막으로 기존에 디폴트로 사용하던 user를 import후에도 사용하고 싶어면 “ubuntu config –default-user” 를 사용하여 사용자를 지정한다.
ubuntu 20.04인 경우 ubuntu가 아닌 ubuntu2004임
import E:\WSL2\ 폴더를 확인해보면 ext4.vhdx 파일이 있는 것을 볼 수 있다.
PS C:\WINDOWS\system32> wsl --shutdown
PS C:\WINDOWS\system32> wsl -l
Linux용 Windows 하위 시스템 배포:
Ubuntu-20.04(기본값)
PS C:\WINDOWS\system32> wsl --export Ubuntu-20.04 E:\tmp\Ubuntu-20.04.tar
네트워크 연결이 로컬 시스템에 의해 취소되었습니다.
PS C:\WINDOWS\system32> wsl --export Ubuntu-20.04 E:\tmp\Ubuntu-20.04.tar
PS C:\WINDOWS\system32> wsl --unregister Ubuntu-20.04
등록 취소 중...
PS C:\WINDOWS\system32> wsl --import Ubuntu-20.04 E:\WSL2\ E:\tmp\Ubuntu-20.04.tar
PS C:\WINDOWS\system32> wsl -l
Linux용 Windows 하위 시스템 배포:
Ubuntu-20.04(기본값)
PS C:\WINDOWS\system32> ubuntu2004 config --default-user mrchaos
Expanding the size of your WSL 2 Virtual Hard Disk
WSL 2 uses a Virtual Hard Disk (VHD) to store your Linux files. In WSL 2, a VHD is represented on your Windows hard drive as a .vhdx file.
The WSL 2 VHD uses the ext4 file system. This VHD automatically resizes to meet your storage needs and has an initial maximum size of 256GB. If the storage space required by your Linux files exceeds this size you may need to expand it. If your distribution grows in size to be greater than 256GB, you will see errors stating that you’ve run out of disk space. You can fix this error by expanding the VHD size.
To expand your maximum VHD size beyond 256GB:
- Terminate all WSL instances using the command:
wsl --shutdown - To find your distribution installation package name (‘PackageFamilyName’):
- Using PowerShell (where ‘distro’ is your distribution name) enter the command:
Get-AppxPackage -Name "*<distro>*" | Select PackageFamilyName- For example:
Get-AppxPackage -Name "*Ubuntu*" | Select PackageFamilyName
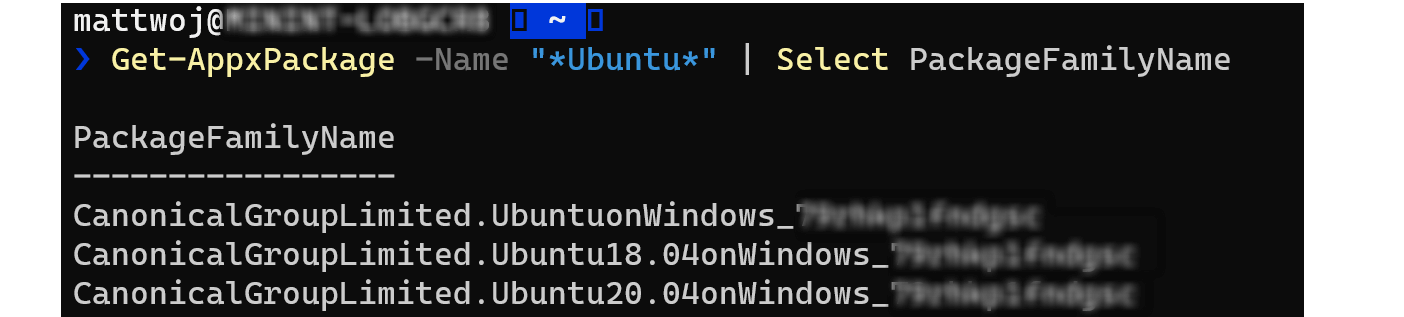
- Use the resulting
PackageFamilyNameto locate the VHD filefullpathused by your WSL 2 installation, this will be yourpathToVHD. To find the full path:- In your Start menu, enter: “%LOCALAPPDATA%” and select to open the %LOCALAPPDATA% file folder.
- Next, open the “Packages” folder and search for the
PackageFamilyNameof your distribution. Open that folder (ie. CanonicalGroupLimited.Ubuntu20.04onWindows_79xxxxx). - Inside the
PackageFamilyNamefolder, open the “LocalState” folder and find the<disk>.vhdxfile. - Copy the path to that file, it should look something like:
%LOCALAPPDATA%\Packages\<PackageFamilyName>\LocalState\<disk>.vhdx - For example, the
<pathToVHD>for Ubuntu 20.04 should look something like:%LOCALAPPDATA%\Packages\CanonicalGroupLimited.Ubuntu20.04onWindows_79xxxx\LocalState\ext4.vhdx.
- Resize your WSL 2 VHD by completing the following commands:
- Open Windows Command Prompt with admin privileges and enter:cmdCopy
diskpartcmdCopyDISKPART> Select vdisk file="<pathToVHD>"cmdCopyDISKPART> detail vdisk - Examine the output of the detail command. The output will include a value for Virtual size. This is the current maximum. Convert this value to megabytes. For example, if the detail output shows Virtual size: 256 GB, convert this to 256000.
- The new value you enter must be greater than this original value. As an example, to double the virtual size listed above, you could enter the value: 512000. Once you have determined the number you would like to set for your new size (in megabytes), enter the following command in your Windows Command Prompt diskpart prompt:cmdCopy
DISKPART> expand vdisk maximum=<sizeInMegaBytes> - Exit diskpartcmdCopy
DISKPART> exit
- Open Windows Command Prompt with admin privileges and enter:cmdCopy
- Launch your WSL distribution (Ubuntu, for example).
- Make WSL aware that it can expand its file system’s size by running these commands from your WSL distribution command line.BashCopy
sudo mount -t devtmpfs none /dev mount | grep ext4- You may see this message in response to the first mount command: “/dev: none already mounted on /dev.” This message can safely be ignored.
- Copy the name of this entry, which will look like:
/dev/sdX(with the X representing any other character). In the following example the value of X is b:
sudo resize2fs /dev/sdb <sizeInMegabytes>M- Using the example from above, we changed the vhd size to 512000, so the command would be:
sudo resize2fs /dev/sbd 512000M.
sudo apt install resize2fs.The output will look similar to the following:BashCopyresize2fs 1.44.1 (24-Mar-2021) Filesystem at /dev/sdb is mounted on /; on-line resizing required old_desc_blocks = 32, new_desc_blocks = 38 The filesystem on /dev/sdb is now 78643200 (4k) blocks long.